实验手册-07-Service-修改

[[实验手册]] [[Kubernetes]]
实验准备
执行以下两条命令,修改防火墙规则:
firewall-cmd --add-masquerade --permanent
firewall-cmd --reload
实验步骤
任务一:创建Service,并通过IP访问
步骤1 创建配置文件
vim httpd.yaml文件内容如下:
apiVersion: apps/v1
kind: Deployment
metadata:
  name: httpd
spec:
  replicas: 3
  selector:
    matchLabels:
      app: web_server
  template:
    metadata:
      labels:
        app: web_server
        run: httpd
    spec:
      containers:
      - name: httpd
        image: httpd
        ports:
        - containerPort: 80
步骤2 加载配置文件
kubectl apply -f httpd.yaml步骤3 验证一下:
kubectl get pods -o wide
步骤4 创建Service的配置文件
vim httpd-service.yaml文件内容如下:
apiVersion: v1
kind: Service
metadata:
  name: httpd-service
spec:
  selector:
    run: httpd
  ports:
  - protocol: TCP
    port: 8080
    targetPort: 80
步骤5 加载配置文件
kubectl apply -f httpd-service.yaml步骤6 验证一下,查看 Service 列表
kubectl get service
一个名为 httpd-service 已经被创建,而且它拥有IP 10.99.244.241,我们访问一个这个IP:
curl 10.99.244.241:8080
我们看看 Service 的详细信息
kubectl describe service httpd-service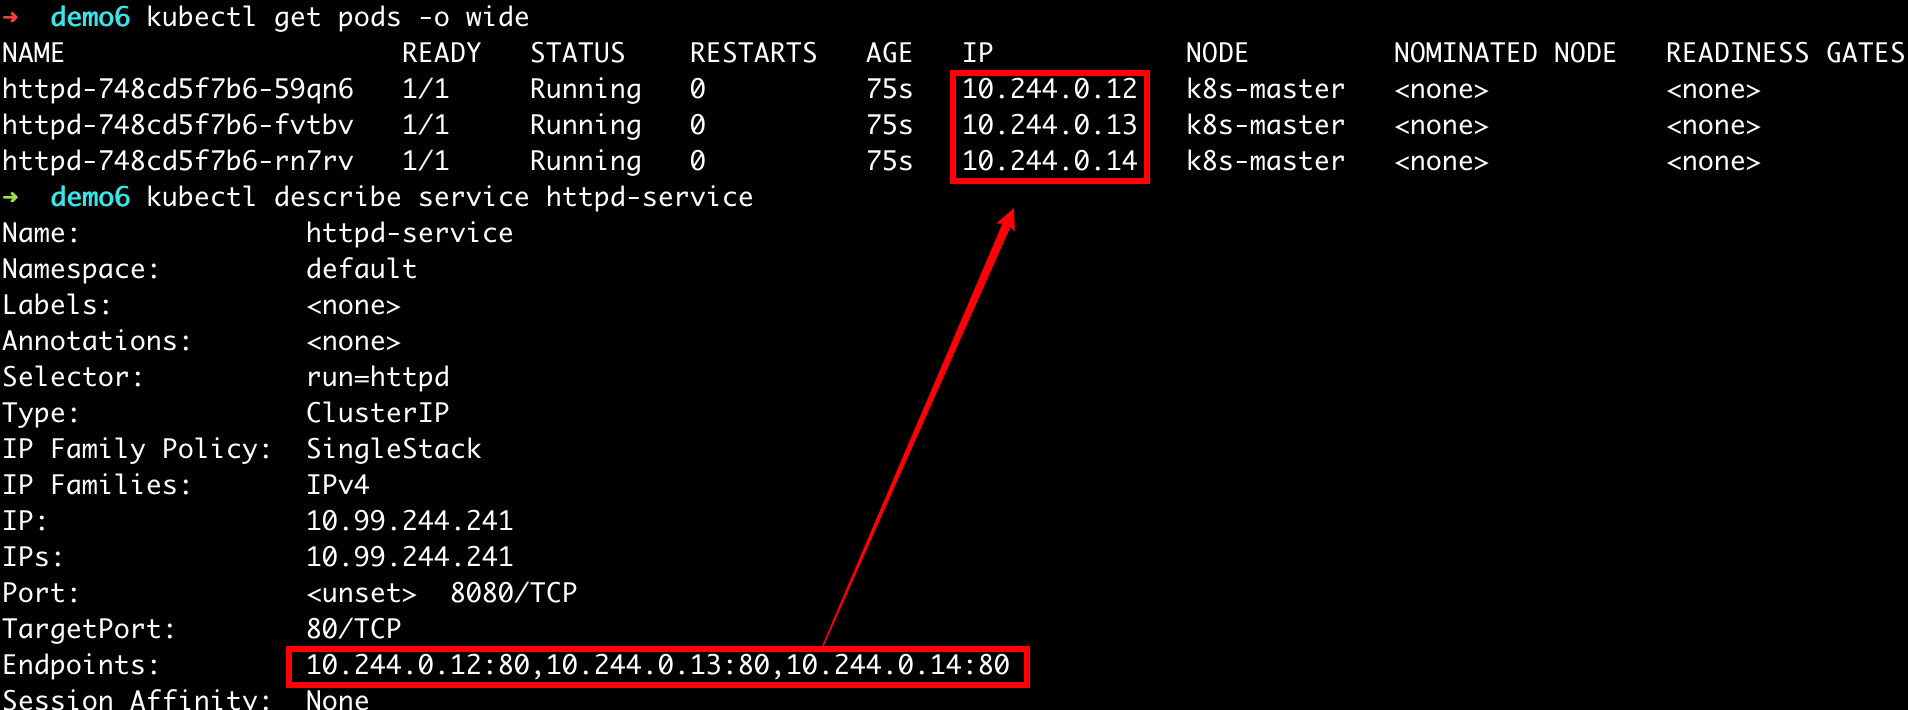
任务二:通过DNS访问Service
在 Cluster 内部,除了可以使用IP访问Serviec,还可以使用DNS访问(域名)
步骤1 启动一个 busybox 镜像来访问刚才创建的 Service

注解:busybox 中包含了用C写成的一系列工具
步骤2 访问 Service
wget httpd-service:8080
看到上图中的结果代码下载主页成功
注解:为什么不用
curl httpd-service:8080这条命令? 因为 busybox 镜像中没有这条命令
步骤3 查看上条命令下载的文件
cat index.html
可见这个文件的内容和【任务一 步骤6】中通过 curl 10.99.244.241:8080 获得的结果是一致的。
最后退出 busybox 这个镜像,执行以下命令
exit任务三:外网访问
步骤1 创建一个新配置文件
vim httpd-service-2.yaml文件内容如下:
apiVersion: v1
kind: Service
metadata:
  name: httpd-service
spec:
  type: NodePort
  selector:
    run: httpd
  ports:
  - protocol: TCP
    port: 8080
    targetPort: 80
该配置文件与
httpd-servie.yaml相比,多了第6行
步骤2 加载该配置文件
kubectl apply -f httpd-service-2.yaml步骤3 验证
kubectl get service
我们在防火墙中增加一条规则,开放 Service 中的端口:
firewall-cmd --zone=public --add-port=32748/tcp --permanent把32748换成你自己的端口
重新加载防火墙规则:
firewall-cmd --reload
让小组内的同学执行以下命令:
curl 192.168.192.215:32748注意把IP换成你自己的服务器IP(以 192.168.192. 开头的IP)

步骤4 自定义 NodePort
刚才的 NodePort 是随机生成的,我们这次指定端口号
修改配置文件
vim httpd-service-2.yaml文件内容如下:
apiVersion: v1
kind: Service
metadata:
  name: httpd-service
spec:
  type: NodePort
  selector:
    run: httpd
  ports:
  - protocol: TCP
    port: 8080
    nodePort: 30000
    targetPort: 80
增加了倒数第二行
步骤5 加载该配置文件
kubectl apply -f httpd-service-2.yaml步骤6 验证
kubectl get service
增加防火墙规则:
firewall-cmd --zone=public --add-port=30000/tcp --permanent重新加载防火墙规则:
firewall-cmd --reload让小组内同学用新端口号访问一下
curl 192.168.192.215:30000